Painting the Pinstripes
As we talked we decided we wouldn't just paint the garage. We were going to add a little personal touch by pinstriping the main wall and adding a Yankees logo. It seemed like a great idea. Looking back it is funny because, at the time, we thought we could complete the project in one day or at most one weekend. Turns out that was completely unrealistic.
We kind of wanted to start painting over the same weekend we moved into the house. Also completely unrealistic. It turns out every house project we planned took way longer and cost more than we expected. Painting the garage was no exception.
The Tuesday night after we moved into the house Alison had class and painting the garage was finally at the top of my list. I made the first of what feels like a million trips to Home Depot to buy supplies. Our plan was still developing so I bought 5 gallons of primer, rollers, paintbrushes, and tape. I thought 5 gallons of primer would be more than enough, but it turned out it was just enough.
I thought I could easily get at least half of the garage primed that night. Instead, I spent the next two hours taping. And I wasn't even done. I covered the floor with cardboard, and butcher-type paper to prevent drips from getting on the floor. I lost my patience with taping and prepping and decided to start painting the areas that I had taped. I got much less done than I had hoped. By the time I had to clean up for the evening I had maybe primed 1/20th of the garage. The enormity of this project began to sink in. I began to wonder if we would ever get this done.
Other than that Tuesday night our week was packed with scheduled events. We had no time to work on the project until that Sunday. I woke up early that Sunday and got back to painting. When Alison woke up she joined me. We had good intentions of ending in time to get cleaned up to make it to church, but the day got away from us. We were so engrossed in the project that when we checked the time church was about to start. On the positive side with Alison's help, we made great progress. By the time we were done for the day the garage was around 80% primed and painted with a coat of grey paint. Initially, we were just going to prime the ceilings, but it didn't look great so we did a second coat on the ceilings as well. We painted the entire garage (except for the main wall) frosty white, which is this very light grey that we used throughout our house.


We learned a lot about painting. The primary tools we used were rollers and brushes. We also borrowed a ladder from Alison's parents. If I was ever going to do a painting project that was this big (and involved painting a ceiling) I would not roll it. I would buy or rent a sprayer. Every time I was done painting I was sore all over. My legs were bruised from leaning against the ladder and my neck was sore from looking up at the ceiling. Alison decided we will never do a painting project that is this big again. She was pretty happy with my buddy who suggested we do this project. She let him know as much when we saw him that week at a work dinner. Next time Alison wants to hire a pro.
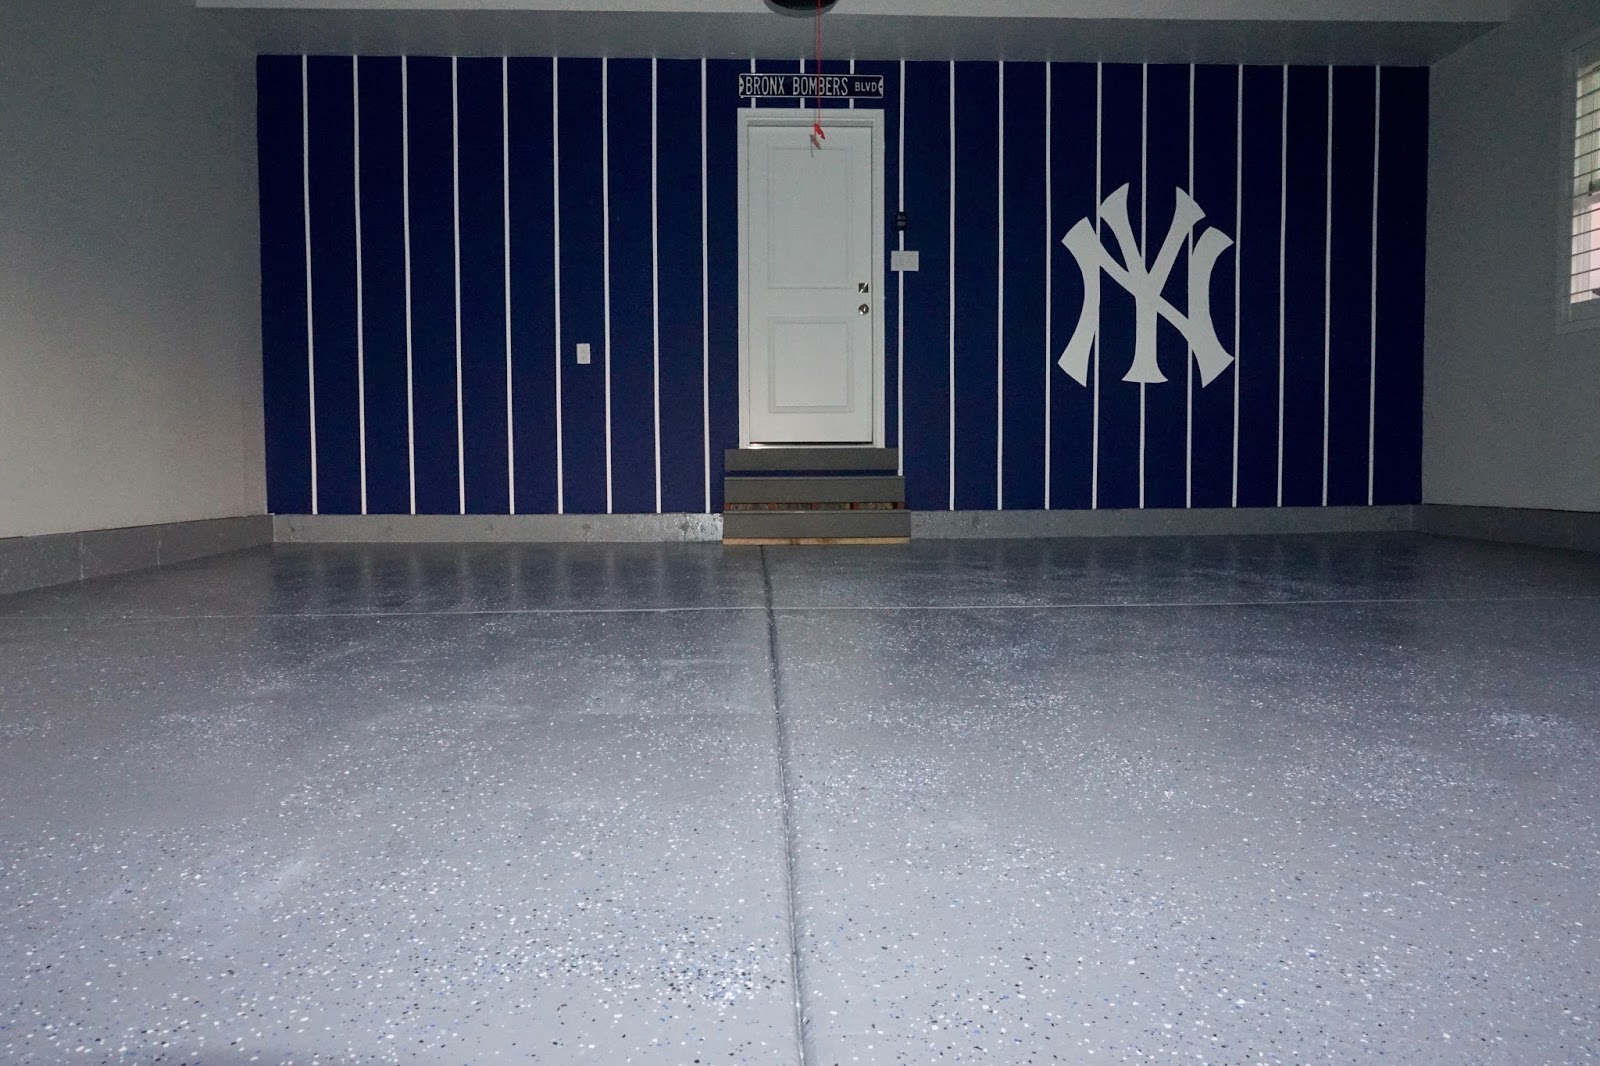
Alison had class again the next Tuesday so I continued working on the garage. I got the priming to 98% complete. Work was ramping up for me. So Alison finished priming and she painted the main wall completely white. By the weekend we thought we could wrap it up. I woke up early on Saturday morning and I finished the second coat on the garage. I only had about 20% left and thought it would go more quickly, but it took until midday. Then it was time to move on to the next stage of the project. We went and bought navy paint and some tape (frog tape - it was awesome). We needed to figure out a way to tape straight lines on the wall for the pinstripes. At first, we tried going high-tech by renting a laser level. It was an epic fail. Instead, we went much more low-tech. We borrowed a 6-foot-tall level from our brother-in-law, Dan. We measured out from the wall 12 inches and then I held the level while Alison taped. I would then move the level up the wall so that Alison could keep taping. We repeated this process every 12 inches. Every couple of pinstripes we would step back and make sure it looked good. This was a pretty time-intensive activity, but the results were excellent.
Once we had the wall taped we painted the entire wall navy blue. We were hoping we would only need one coat, but as the pint dried it became apparent we would need two. I ran back to Home Depot for the umpteenth time and bought a quart of navy paint. We finished painting and let it dry for a few minutes before pulling the tape off. The pinstripes looked pretty good, but there were some spots where the blue paint seeped under the tape.

We waited for the paint to dry and then taped off the areas where seepage occurred and cleaned up the pinstripe. While I was cleaning up the pinstripes Alison got to work on the NY logo. We had purchased the logo about a month before, back when we decided it was a good idea to paint the garage. We searched the internet and found there weren't a lot of good options. We found a few large decal-like stickers. The problem was the reviews indicated these stickers did not hold up well in garages due to the temperature fluctuations. We eventually settled on a large plastic yard stencil. This stencil was designed so that you can spray paint the NY logo into a yard.

It worked okay for our purposes, but it was a little rough. It was very difficult to get the stencil to lay flat on the wall. It was also very difficult to prevent the paint from dripping. We made a key error while using the stencil. We were not patient enough and tried to apply a second thick coat of white paint too quickly. This caused the paint to bunch up and lead to poor application quality. We finally finished and pulled the stencil down. We were not satisfied with the result. The next day we bought some sandpaper and sanded down the areas that were uneven. We then taped around the logo and repainted it with white paint. This greatly improved the look and feel of the logo. We let the white paint dry and then we taped off the logo again, this time so we could touch up the navy paint around the logo. This got us the crisp clean lines that we wanted.


Finally, the walls were completely painted and only one big project remained - the floor. I bought a Rustoleum garage floor kit from Lowe's. Alison had to go out of town for work this weekend. While she was gone I worked on the floor. First I had to move everything out of the garage. This meant moving our garbage cans and disposing of the cardboard I used to protect the floor from paint. I then swept the floor three times. After I swept the floor I used a hose to wet the garage floor. Once it was wet I scrubbed it with a brush and removed excess water and dirt with a squeegee. I waited while the floor dried.
While it was drying Dan came over and helped me install a dog door in the wall of the garage and a cat door leading into the basement. The cat door wasn't difficult. The dog door was somewhat challenging because we had to cut into both sides of the garage. Dan is excellent at home improvement projects and had all the tools we need to do a great job. I could not have done it without him. Now we just need a fence and we will be all set for our new puppy.


I swept up the sawdust and then I moved on to the most important prep step. I acid-etched the floor by mixing four gallons of water with an acid mix. I used a watering pot to pour the mix evenly over the garage floor. Once the acid had etched the cement I used the squeegee to remove excess water and acid.
I let the acid dry overnight. The next day I sprayed off the floor again and used the squeegee to remove excess water. I waited for it to dry. I then mixed it together with the part a and part b cans of floor paint. I stirred for three minutes and got to work painting. I had to work fast, due to the temperature, each can only have a can life of about 90 minutes. I decided to paint the foundation as well as the floor of the garage. I used a brush to paint the foundation and corners and rolled the rest of the floor. I would roll an area and then scatter decorative chips (to provide texture and make the floor less slick). I finished half of the garage with the first gallon of floor paint and completed the process again for the second half of the garage. It sure felt good to have the entire floor painted. I waited a few hours and then pulled the painter's tape off the walls. Unfortunately, when I pulled the tape off of the walls it pulled off some paint so I had a little bit of touch-up work to do the next day.

As of today, I am completely done with the project. All told Alison and I probably spent around 40 hours on this project. Now that the garage is painted and I couldn't be happier. Every day when I pull into the garage it is going to gives me immense joy and that makes the whole project worthwhile.


Comments
Post a Comment